For those that don't know my wife and I are expecting our second child in the spring. Naturally this screws up my modeling. That and I'm working a lot more thanks to the swine flu.
So, to keep from spending major funds on the swamp and to use up a lot of HO stuff that I already have, I've designed a small layout called the Dixie Central. My main goal is to use this layout to help me get three or four more AP certificates with the NMRA.
It's got its own blog spot, so come join us! I started construction today.
Follow along here...
http://dixiecentralrailroad.blogspot.com/
Wednesday, November 25, 2009
Sunday, August 30, 2009
Gator's Bait Shack 02
Normally I start with a prototype structure. It is rare that I freelance. In this case I want to make and exception because I want something with a uniquely creepy charm to it. Ok, well, I actually did start with a prototype structure in a way.
 This is the Chesser's Cabin on Chesser Island. It has been preserved and this is how it appears today. It has a lot of character and I'll be using a lot from this structure. Notice the cypress wood used in construction. The building is elevated on wood stump sections, instead of rocks which are no where to be found in the swamp. I expect that Gator's shack will not be so well kept and would not be sitting in the middle of the island like this, but closer to the water where his customers would want him to be. Notice the white and sandy soil.
 Here is the Chesser compound. Notice the dark greens and bright white colors! This ariel shot is excellent!
 Once I've looked at structures similar to what I want, I grab the sketch book. My first quick drawing was of a standard building. This one has absolutely no character or appeal and I kicked it out immediately.
 As I often do, I analyze the business first. What do they sell? Who do they sell it too? What products are made on sight? What do they bring in? When you start asking yourself these questions you start to understand what the business does. So instead of working on the structure, I started on what the needs of the business might be. We need docks. We need still. We need bait ponds. All of a sudden the Gator's Bait Shack Compound comes to life!
 After sketching out the very rough compound diagram, I start trying to put it into a 3-D image. I'm still on the charcoal pencil and sketch book stage. As you can see the massive cypress trees will overcast much of the shack. Just about the level of creepy I want, but way to much like a business than just a guy trying to get by. Needs more work.
Things I want to include in the shack...
Exterior
- Alligator hydes drying on the side of the building
- Outhouse
- Moonshine still
- Pole boats and oars for rent
- Board walk
- Plank walk way
- Bait pond for raising minnows
- Well with counterbalance pole
- Washtubs for catches
- Cypress wood planking
- Screen windows and doors
- Chairs on the porch
- Night lanterns illuminated
- Piling construction around dock
- Fishing gear and hunting gear
- Old metal signs
- Stick chimney
- Tin roof
- Red light
- Sales counter
- Guns and ammunition
- Fishing gear
- Animal heads on the wall and fish mounted
- Bedroom for Gator
- Wild Mabel's bedroom
- Poker table
- Wood slat chairs
- Vittles cooking
- Moonshine jars
Gator's Bait Shack 01

"Gator" Joe Saunders lived in the Okefenokee. This is a close of up Gator from the book Okefinokee Album written by Francis Harper and Delma E. Presley. We don't know a lot about Gator Joe, but I love his picture. He appears to be the quintessential swamper/tough guy. He reminds me of Tom Laughlin in the movie Billy Jack. The bowler style hat gives him a unique appearance.

Swampers were hunters, so it only goes that there should be a place to gather for a hunt. There were several hunting lodge shacks in the area, but my guess is that there was a place that was a bit more than just a place to keep the rain off your head.
So, as the story goes, Gator Joe Saunders turns a hunting shack into a more enterprising place as interest in hunting and fishing in the swamp grows. You need a place to get a pole boat, the prefered method of travel in the thick swamp. You need bait and shells. Food, directions and other geat. You also need a Mason jar...just for emergencies, mind you. Thus, Gator's Bait Shack is born.
Gator's Bait Shack will be nestelled on Honey Island. It is build on a sandy soil and most of the operations is on pilings. There are walking boards and place to tie up. There is ample covered areas to keep the rain off the gear and the ever present tin roof. The structure is clapboard cypress with screen wire to keep the critters out.
You can buy what you need at Gator's. Buy some things you don't need when Wild Mabel comes by on Saturday night. Even more evil when the cards are on the table and the still is in operation. Its a hangout for hunters, scoundrels and folks who's morals are a bit in question. You shouldn't go there at night unless you are expected. A fellow with a shotgun is always on the lookout for revenuers, uninvited loggers or other undesireables.
So let's start designing the swamp's first habitat...Gator's Bait Shack
Wednesday, August 19, 2009
Dried Flower Supplier For Tree Stock
Boone Morrison kindly shared his source for asparagus fern...and possibly my new source for Plumosa Fern that I use for cypress trees.
http://www.woodcreekdrieds.com/drieds.html
Another good dried plant to use is Ming Fern. It works great for evergreens.
http://weddingflowersofamerica.com/index.php?main_page=product_info&products_id=168
http://www.freshrosepetals.com/ming_fern_46_prd1.htm
These vendors are selling FRESH greenery, so you have to preserve it in a glycerin/water solution. Better to buy it dried.
Sunday, August 16, 2009
More Views of the Elkhorn Iron and Timber Company
Steve Austin really makes me want to go to the basement and get busy!
Here's his latest...hit the SLIDESHOW option and enjoy!
http://s3.photobucket.com/albums/y94/sea1109/The_new_Elkhorn_Iron_and_Timber_Co/
This is all On30!
Here's his latest...hit the SLIDESHOW option and enjoy!
http://s3.photobucket.com/albums/y94/sea1109/The_new_Elkhorn_Iron_and_Timber_Co/
This is all On30!
More O Scale Parts
Gator's Bait Shack is going to take a lot of details. My first stop will probably be my buddy Pat Turner at Turner Model Works. He usually has everything I need.
http://www.tmwshop.com/
My next stop is Keith Wiseman at Wiseman Model Services:
http://www.locopainter.com/store/
I love O scale because there are a lot of parts available, but if what you need should not be available, then it is large enough you could produce it yourself. Most likely I will make my own pole boats, alligators and other native Okefenokee parts. Drums, barrells, chairs, and your normal everyday items will come from the parts dealers.
Got a favorite O scale parts house? I love to have the link!
The Backshop - Link and Pin Couplers
I'm excited to find that the Backshop, a model train supply company that focuses on O scale, has really nice link and pin couplers.
http://home.onemain.com/~thebackshop/link.htm
They have a horrible website. Hard to navigate and rough on the eyes. Says they have been in business for 50 years.
http://home.onemain.com/~thebackshop/
They do have one very handy service: they take plastic parts and turn them into brass!
http://home.onemain.com/~thebackshop/plastics.htm
My biggest complaint...they don't have a catalog of parts available on the website! In this day and age, to pay $4.00 to snail mail a catalog is crazy. Why not put a PDF on the site. Probably be a long time before I order any parts here.
THE BACK SHOP
PO Box 15285,
Sacramento, CA 95851-0285 USA
Email: dbraun@jps.net
Homepage: http://home.onemain.com/~thebackshop
Saturday, August 8, 2009
More Gator Shots
My good friend Steve Berkheimer sent me some more great photos of alligators and they show him in the reeds and lilly pads. Excellent!
If you have some good swamp photos, would you share them with me?
If you have some good swamp photos, would you share them with me?
Thursday, August 6, 2009
Okenfenokee Videos
I'm at my mother's house taking care of her while she recovers from surgery. Because of the interruptions its been hard to work so I've been scanning some videos on the Okefenokee. I'm doing this mostly to gather more scenery ideas. Here are the links...
Alligator in the Water The main thing I got out of this one is that the gator swims very low in the water and you don't see much of him. Notice how the branches and brush grow about 3-4 feet out over the water. This is a key scenic element because most people to do not have vegetation past the vertical edge of the water.
Gators and Cypress Stumps Some very nice old stumps in this one.
Sunday, August 2, 2009
Slow Going
I've not been able to work on the layout much lately. Just too busy. I'm going to carve some more alligators and start work on the HO scale cypress trees...but just can't get a minute to do so. Plus, I had to put the SUV in the shop so I can't leave the house much.
I need parts to finish the light installation job!
I need parts to finish the light installation job!
Wednesday, July 29, 2009
On The Road Again!
I'm off to Enid, Oklahoma for a three day trip this morning. To keep me out of bars and away from wild women in the evenings, I've included a current issue of Model Railroader and about 50 photos of alligators to study. During the trip I'll draw and sketch 12 gator models that I'll build in clay and cast.
We'll need lots of these critters in all sizes!
I used to carry modeling tools with me, but they really confuse the rocket scientist that work for Homeland Security. They either won't check my bag or steal them.
So I do my design work when I'm on the road.
We'll need lots of these critters in all sizes!
I used to carry modeling tools with me, but they really confuse the rocket scientist that work for Homeland Security. They either won't check my bag or steal them.
So I do my design work when I'm on the road.
Sunday, July 26, 2009
Close Up Pictures of an Alligator

On my trip to Birmingham we stopped for a visit to the Birmingham Zoo, which is quite nice. They had a "swamp" there and a big old fat American Alligator. He obliged me by sitting very still and only stretching once in a while as he baked in the sun. I shot several hundred detail photos of this fellow.

The swamp was covered in duck week, a green moss that completely blankets the top of the water.
 Just under the surface are small turtles and frogs....and....
 Alligators! This bull gator was about eight feet long and probably weighed around 900 lbs.
This fellow is one of two that I could see. He was basking in the sun and the duck weed was stuck all over his body. A nice bit of camouflage.
 This is as close as the zoo would let me get to the alligator. Actually, I wouldn't have even gotten that close except that it is a good ways down to his pen and lots of steel wire separates us.
 I have GREAT respect for alligators as I once watched a buddy of mine become a snack for one about the same size as this gator. If you want the story, post a comment saying so and I'll write it down.
Sunday, July 19, 2009
Sculpting Alligators
 In the 1920's Okefenokee Swamp, the alligators still reigned supreme. While the average gator was about 8 feet long, specimens in excess of 13 feet were common and reports of gators around 16 feet were not unheard of.
In order to model the swamp I think I'll need about 12 alligator masters to make about 40 models. The gators available as parts in 0 scale stink, so I'll have to carve my own. I took a stab at it today and my first effort was really good, but I got the head dimensions wrong. So, let's start studying alligators and taking pictures.
Information on Alligators
American Alligators
Gator Pictures
Computer Model of Alligator
Saturday, July 18, 2009
Big Doings In the Okefenokee - NCI Work Night
Every had one of those nights when everything you did was stupid? That was last night!
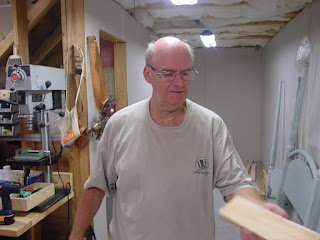
Attendance:
Gator Scott
Glue Bob
Packrat Paul
Concrete Keith
Steve-bay Steve
Coalfinger Keith
Reverend Rick
 Here is the pile of lighting materials that I bought at Lowes. See the missing item? It is a small grommet-like device called a connector that is used to hold the electrical line in place. The reason you don't see them is because I didn't know to buy them. Looks like we won't get far. Thanks to my friends, though...they kept me from making a big mistake!
 Rick Wade Photo
Gator gets out the first drop ceiling light. Packrat and Coalfinger look on. Packrat has a foot issue going and we hope he gets well soon. I think he broke it building his layout. Paul plays hard ball when he's building layouts!
 There are two ways to put the lights in so that they are in the middle of the room. We took the plan on the left.
 There are five each 2x4 light sets.
 I showed the guys my Swamp Book. This is a 3" ring binder full of photos of the swamp that I use for carving stumps and trees. And alligators!
 EAch photo has been carefully selected to help me build the layout.
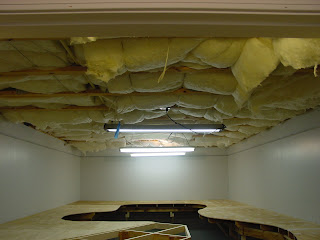 Here are the inexpensive temporary lights and the ugly insulation. Yuck.
 Rick Wade Photo
The guys take all the boxes apart and move them to the train room.
 Concrete and Steve-bay take on installing the return loop that is outside of the train room, next to the furnace. This is a hidden continous run loop just for show. The loop is 18" but Keith decides that he is working on his layout at home and makes them 30".
 Rick Wade Photo
Using scrap lumber Keith makes carefully detailed drawings.
 Rick Wade Photo
Using a radius tool, Keith makes the radius drawings while Steve waits with the saw.
 Rick Wade Photo
Using the sabre saw, Keith and Steve cut out the radius plates.
 Rick Wade Photo
Every few minutes Steve counts his fingers. Still has all ten.
 Here you can see Rick talking and drinking coffee. The dog is waiting for him to drop one of Marie's fresh made brownees. You can see the radius sections.
 After a quick check in with the foreman, we realize that 30" radius won't fit in the space allowed for the 18" radius. Ok, back to the drawing board. Let's just make a table and Scott can lay any radius he wants.
 Rick Wade Photo
Meanwhile Scott climbs the ladder and knocks in the boxes for the lights and strings the electrical line.
 Paul has taken on the project of wiring in two switches. Little does he know, its a trap!!!
 "I'll be damned if I can figure out what is going on here. I know Scott did this part of the wiring, so I'll ask him!"
 Rick Wade Photo
OOPS! Scott wired the thing wrong. Not only did he wire it wrong but it is so bad we'll have to cut out the sheetrock to figure it out. Scott is feeling stupid tonight. That is two strikes and we've not even made it to the first coffee break.
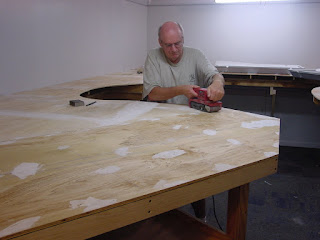
 Bob, Ken and Rick took on the task of filling in the screw head holes and finishing up the benchwork top.
 Rick was actually working. Rare, but this is a real photo...not staged.
 Ken is sucking up the dust as the Rick sands. Bob is demonstrating the real strenght of this overbuilt benchwork.
 Scott is wiring up the lights and getting them ready to install.
 Rick Wade Photo
I believe Paul has figured out the wiring now!
 "Now let's just hope Scott didn't leave one of these wires hot!"
 Meanwhile, Keith and Steve are building a weekend getaway home for the Perry's.
 Rick Wade Photo
"Hey guys, want to come see the new table!"
 Rick Wade Photo
If its messy, Bob is the first to volunteer. I'd hate to have to do his laundry.
 The big shop vac really sucks.
 Here are the ballasts in the lights and the pigtail connector system, waiting on Scott who didn't bring the connectors.
 Almost done with the sanding!
 Rick found a few more holes and some screws that didn't go in all the way. He's driving them home.
 Wiring is in for the lights!
 Switches are in!
 Here is the wall section we had to remove because Scott is stupid!
 The decking is almost done! We'll cut the holes later.
 I'm not sure if I can get enough radius in this tight spot. Oh well. It may make a nice storage shelf.

This time we LABELED all the wires.
 Some last touches and we'll be ready for the gurney.
 If you want to build a layout, get a Bob. A Bob is a perfectionist, and when you are a generalist like me (that's French for sloppy) you need a Bob to keep you on track.
 We put the top on the gurney and realized it was a tad too tall. Keith suggested we bore out the set holes on the castors.
 Rick Wade Photo
GLUE BOB! GLUE BOB! GLUE BOB!
 A little drilling and some wrench work and the gurney is lowered!
 Here you can see the bottom of the gurney.
 Here is where we drilled the plywood out with a 1" spade bit.
 Bob made some cleats to raise the gurney up and keep it still.
 Here are the cleats mounted on the layout.
 A little sanding to make it fit and...
 A little more sanding to make it fit. DONE!
Wow, did we get a lot done tonight! Thanks guys for all the help and the fun!
Attendance:
Gator Scott
Glue Bob
Packrat Paul
Concrete Keith
Steve-bay Steve
Coalfinger Keith
Reverend Rick
 Here is the pile of lighting materials that I bought at Lowes. See the missing item? It is a small grommet-like device called a connector that is used to hold the electrical line in place. The reason you don't see them is because I didn't know to buy them. Looks like we won't get far. Thanks to my friends, though...they kept me from making a big mistake!
 Rick Wade Photo
 There are two ways to put the lights in so that they are in the middle of the room. We took the plan on the left.
 There are five each 2x4 light sets.
 I showed the guys my Swamp Book. This is a 3" ring binder full of photos of the swamp that I use for carving stumps and trees. And alligators!
 EAch photo has been carefully selected to help me build the layout.
 Here are the inexpensive temporary lights and the ugly insulation. Yuck.
 Rick Wade Photo
 Concrete and Steve-bay take on installing the return loop that is outside of the train room, next to the furnace. This is a hidden continous run loop just for show. The loop is 18" but Keith decides that he is working on his layout at home and makes them 30".
 Rick Wade Photo
 Rick Wade Photo
 Rick Wade Photo
 Rick Wade Photo
 Here you can see Rick talking and drinking coffee. The dog is waiting for him to drop one of Marie's fresh made brownees. You can see the radius sections.
 After a quick check in with the foreman, we realize that 30" radius won't fit in the space allowed for the 18" radius. Ok, back to the drawing board. Let's just make a table and Scott can lay any radius he wants.
 Rick Wade Photo
 Paul has taken on the project of wiring in two switches. Little does he know, its a trap!!!
 "I'll be damned if I can figure out what is going on here. I know Scott did this part of the wiring, so I'll ask him!"
 Rick Wade Photo
 Bob, Ken and Rick took on the task of filling in the screw head holes and finishing up the benchwork top.
 Rick was actually working. Rare, but this is a real photo...not staged.
 Ken is sucking up the dust as the Rick sands. Bob is demonstrating the real strenght of this overbuilt benchwork.
 Scott is wiring up the lights and getting them ready to install.
 Rick Wade Photo
 "Now let's just hope Scott didn't leave one of these wires hot!"
 Meanwhile, Keith and Steve are building a weekend getaway home for the Perry's.
 Rick Wade Photo
 Rick Wade Photo
 The big shop vac really sucks.
 Here are the ballasts in the lights and the pigtail connector system, waiting on Scott who didn't bring the connectors.
 Almost done with the sanding!
 Rick found a few more holes and some screws that didn't go in all the way. He's driving them home.
 Wiring is in for the lights!
 Switches are in!
 Here is the wall section we had to remove because Scott is stupid!
 The decking is almost done! We'll cut the holes later.
 I'm not sure if I can get enough radius in this tight spot. Oh well. It may make a nice storage shelf.
This time we LABELED all the wires.
 Some last touches and we'll be ready for the gurney.
 If you want to build a layout, get a Bob. A Bob is a perfectionist, and when you are a generalist like me (that's French for sloppy) you need a Bob to keep you on track.
 We put the top on the gurney and realized it was a tad too tall. Keith suggested we bore out the set holes on the castors.
 Rick Wade Photo
GLUE BOB! GLUE BOB! GLUE BOB!
 A little drilling and some wrench work and the gurney is lowered!
 Here you can see the bottom of the gurney.
 Here is where we drilled the plywood out with a 1" spade bit.
 Bob made some cleats to raise the gurney up and keep it still.
 Here are the cleats mounted on the layout.
 A little sanding to make it fit and...
 A little more sanding to make it fit. DONE!
Wow, did we get a lot done tonight! Thanks guys for all the help and the fun!
Subscribe to:
Posts (Atom)

