I'm off to Enid, Oklahoma for a three day trip this morning. To keep me out of bars and away from wild women in the evenings, I've included a current issue of Model Railroader and about 50 photos of alligators to study. During the trip I'll draw and sketch 12 gator models that I'll build in clay and cast.
We'll need lots of these critters in all sizes!
I used to carry modeling tools with me, but they really confuse the rocket scientist that work for Homeland Security. They either won't check my bag or steal them.
So I do my design work when I'm on the road.
Showing posts with label design. Show all posts
Showing posts with label design. Show all posts
Wednesday, July 29, 2009


Tuesday, July 7, 2009
Stumpede! Carving Cypress Stumps
I built a carving station as I have about 120 carvings to make which include trees, stumps and knees for the swamp. Might as well have a good place to make them. I'll start with the stumps because when you are doing the big tree castings you often have a small amount of resin left. I'll take the remnant resin and pour it into a stump or knee mold so that none of it is wasted. Therefore, I need these molds ready before I start the trees.
Before I start carving there is a lot of prep work to be done. The first thing is to research what a real stump looks like. I surfed the web and came up with about 25 stump photos. The thing to keep in mind is what did the stump look like in the time period you were modeling? For me, I'm modeling 1920. The trees the loggers were felling were quite large, some over 12 feet in diameter. They would have been fresh cuts and mostly would have been cut off up high, then the stump cut with a saw. Most of the stump pictures I found on the web were old stumps that were cut about 80 years prior. So we'll have to improvise.
Once I have the pictures, I'll decide how many stumps to make. There is a list on this blog of the stumps and quantity. The first stumps will be the large foreground models, one dozen of them. After deciding the quantity, I then sketch each stump and give it a number so that I can reference the stump to the mold.


Nothing fancy, but it keeps me from making 12 stumps that all look identical. On the layout, each stump can be turned 60 degrees six times to give six different views. That makes 12 stumps turn into 72 different looking stumps.
I sat down last night and carved the first two out of Sculpy clay and left them on the table. Marie saw them and really like the look of the new stumps. I'll wait until I have all 12 and bake them. Then I'll pour the mold. Usually I'll wait until I have enough casting to mold before I order a 10 lb container of silicone molding compound, and then cast them all at once. So I'll wait until I have a set of knees and a few trees, then do them all at once.
By carving a stump or two per night, or a tree or some knees, we'll have the 120 units done in no time.
Marie was fussing at me about not being able to get the train expenses as a write off again. So I've agreed to sell the products I'm making for myself for a tax deduction. Look for Southern Scale Models to start business soon and you can have your own cypress stumps!
Saturday, June 20, 2009
Building a Battleship For the Train Layout
It's hot here at the Swamp. Air conditioner number #2 sprang a leak and the upstairs is a balmy 89 degrees, and its 99 outside so we're not opening the windows. AC #1 is pumping as hard as it can go, but the coolest place is always the basement, so that is where I spent the hot part of the day.
 Taylor and Marie came to visit alot as the cool breeze from the shop fans made it right comfy here in the Swamp.
 I went to Ace Hardward and bought the flat washers and fine threaded nuts to put the castors on the bottom of the gurney. Some people call these moving layout segments "battleships" or "mobile modules" but I still like gurney. The new castors roll very nicely.
 The legs will be made from ripped 3/4" plywood stock cut to 3" and 2" board widths. One 3" to one 2" per leg in L-girder fashion. I do the work on my 8 foot heavy workbench. One thing that I believe all layout builders should do is make sure they save room for a work area. Many layouts I work on are short of space and that makes for sloppy and dangerous work. I have two large rooms, a shop and a two car garage as well as the back yard to work in so we're good.
 I brace up the 2" board then glue and screw the 2" board along the 3" board making an L shape beam.
 Using the new L to support the other board, I repeat the process.
 Once the four legs were built, I screwed them into the bottom box.
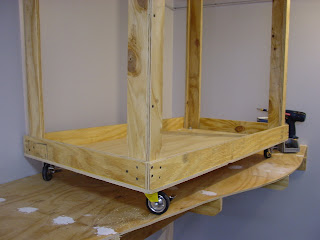 I used a level to make sure they were straight and did the work up on the benchwork so that I wasn't bending over or sitting on the hard floor. Looks good!
 I dropped the assembly to the floor and positioned it under the layout.
 A fan keeps the air circulating. I have not installed the air conditioning yet, but really its not that warm down here. The fan keeps it cool while its 99 degrees outside here in Georgia.
 The legs were checked for position and then the whole assembly was carefully leveled. Once level in every possible way, I anchored the legs onto the top benchwork with 1 5/8" drywall screws. She's solid!
 I rolled the gurney around and she moves great! The heavy base keeps her very stable.
 The gurney can be shoved into the back of the layout room to make way for work on the layout area behind the gurney. Its a little tight, though.
 This one corner needs to go on a diet. It's not a problem since this buildge is a scenic area and not critical to the main line.
 I made a note to myself to cut it back.
 I rolled the gurney out of the room and into the area that will be the crew lounge. Moves great!
 The ultimate test was to see if I could get it into the shop. I was able to get it inside fine!
 I can even turn it 360 degrees. This way I can do detail work on this section in the comfort of the shop where all my tools are, and in a climate controlled environment. I'm also next to the airbrush.
Oops! Scratch that idea. I could get it in to the shop because of the angled cut on one side. However, it wouldn't come out! This could be a pain. I had to tip it over to get it out.
 The final step was to build another shelf in the gurney. This shelf will hold the DCC system when the gurney is on tour as well as tools and models. It is much more shallow than the bottom shelf.
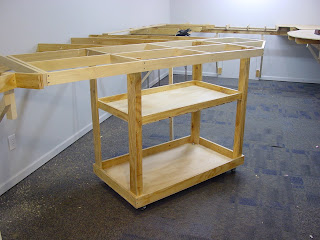 There! All done! Now my rolling display can go anywhere.
There is still just a little more benchwork to do, and I still don't have the right sanding belt, so I'm off to the Home Depot again. I may finish more of the benchwork tonight.
 Taylor and Marie came to visit alot as the cool breeze from the shop fans made it right comfy here in the Swamp.
 I went to Ace Hardward and bought the flat washers and fine threaded nuts to put the castors on the bottom of the gurney. Some people call these moving layout segments "battleships" or "mobile modules" but I still like gurney. The new castors roll very nicely.
 The legs will be made from ripped 3/4" plywood stock cut to 3" and 2" board widths. One 3" to one 2" per leg in L-girder fashion. I do the work on my 8 foot heavy workbench. One thing that I believe all layout builders should do is make sure they save room for a work area. Many layouts I work on are short of space and that makes for sloppy and dangerous work. I have two large rooms, a shop and a two car garage as well as the back yard to work in so we're good.
 I brace up the 2" board then glue and screw the 2" board along the 3" board making an L shape beam.
 Using the new L to support the other board, I repeat the process.
 Once the four legs were built, I screwed them into the bottom box.
 I used a level to make sure they were straight and did the work up on the benchwork so that I wasn't bending over or sitting on the hard floor. Looks good!
 I dropped the assembly to the floor and positioned it under the layout.
 A fan keeps the air circulating. I have not installed the air conditioning yet, but really its not that warm down here. The fan keeps it cool while its 99 degrees outside here in Georgia.
 The legs were checked for position and then the whole assembly was carefully leveled. Once level in every possible way, I anchored the legs onto the top benchwork with 1 5/8" drywall screws. She's solid!
 I rolled the gurney around and she moves great! The heavy base keeps her very stable.
 The gurney can be shoved into the back of the layout room to make way for work on the layout area behind the gurney. Its a little tight, though.
 This one corner needs to go on a diet. It's not a problem since this buildge is a scenic area and not critical to the main line.
 I made a note to myself to cut it back.
 I rolled the gurney out of the room and into the area that will be the crew lounge. Moves great!
 The ultimate test was to see if I could get it into the shop. I was able to get it inside fine!
 I can even turn it 360 degrees. This way I can do detail work on this section in the comfort of the shop where all my tools are, and in a climate controlled environment. I'm also next to the airbrush.
Oops! Scratch that idea. I could get it in to the shop because of the angled cut on one side. However, it wouldn't come out! This could be a pain. I had to tip it over to get it out.
 The final step was to build another shelf in the gurney. This shelf will hold the DCC system when the gurney is on tour as well as tools and models. It is much more shallow than the bottom shelf.
 There! All done! Now my rolling display can go anywhere.
There is still just a little more benchwork to do, and I still don't have the right sanding belt, so I'm off to the Home Depot again. I may finish more of the benchwork tonight.
Saturday, May 9, 2009
Growing Mushrooms
Friday night was Mushroom night over at Packrat Paul's. He has a very complicated mushroom design and I'm thrilled to be working on it. So far I have experience with two of this type of design and they are wickedly difficult to engineer. What fun! I'm learning so much!
 Paul is still in the early stages of construction. This is the center "pit" of the first room and you can see the tons of pre-cut plywood that is needed for the construction.
 The "L" shaped item is the test profile for the upper part of the mushroom. You can see part of the elevated floor below. They designed this last time when I wasn't there. It is very strong and is quite easy to construct. Paul was not happy with the height of the upper level and says he's going to raise it a few inches. We had a lengthy conversation about the backdrop and the back board, which was not resolved at this point. I'm continuing to push for not using Masonite as it is a poor choice for construction here in the very humid South. The team isn't listening to me, so that is probably the way we'll go. I've been meaning to take them over to Howard's house and let him tell them about the Masonite that he ripped out and replaced because it warped.
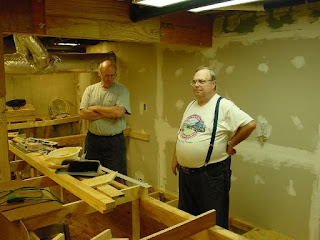 Glue Bob and Coalfinger Ken take an overview of the night's projects. Our first efforts were on the floor just beneath them where we finished cutting the "puzzle pieces" for the raised floor. Packrat was insistent on perfection in the cuts which annoyed some. Frankly I like the detail as it goes a long way to making the layout a nicer place. We may start calling him Picky Paul, but hey...it's his railroad. I'm thinking we were all very tired tonight for some reason. Caffeine is mandatory on late Friday nights.
Where Bob is standing will be the upper levels, one in front and one behind him. While I still don't fully understand the layout, I do know that this area is primarily the narrow gauge line and will have a continuous loop. I had encourage Packrat to build a model of the layout to help others with the spacial understanding and I think this is mandatory for a layout this complicated. I might get a wild hair and build it for him.
 Here is a close up of the upper level mushroom construction profile. This is just a study, and not the real thing. You can see the two L-girders, which we think can be made of boards that are not so long. It is amazingly strong.
 The upper bracing is attached to an L gider that is screwed into the ceiling joists.
 About 40% of the room has elevated flooring. This is of very sturdy construction with thick plywood screwed on top. Packrat plans to use carpet squares to cover the wood. The floor is very comfortable to your feet.
 Paul needs a lot of storage so we spent the rest of the evening building bracing for under layout shelving. We used 2x4 stock, which is overkill, but they are so cheap and he had them to spare. This will provide plenty of storage for Packrat's massive collection.
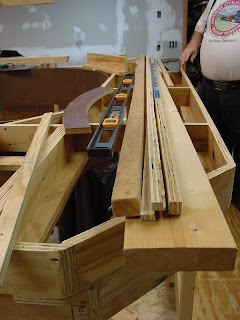 Nothing is wasted here. We are saving every scrap of wood and making the best of it. So far the only thing that has been thrown away is an abundance of sawdust.
 In a moment of weakness, Packrat screwed up some fascia boards just too see what it would look like. I can see the trains running now!
 The room is very busy and cluttered. Mushroom layouts have such a compactness that there is very little room to move or walk. I'd suggested that he provide us with a work table top on the layout somewhere and to corrall the tools in one location so that they could be easily found. Paul also provided a ton of pencils (which we keep losing behind our ears). Our host has provided ample screw guns and charging stations, so batteries are never an issue. The only thing we really need more of are tape measures. I've got four of them now in a central location and it STILL isn't enough. The problem is that with Mushrooms, as the benchwork gets more complete the more difficult it will be to find tools since you have to travel through the layout to find things. I'd recommended a "cut through" on the far end so that you can duck under to the lower level or pass tools through, much like Iron Mike has.
 The floor is held up by 2x4 boards nailed into the concrete. To provide more support we cut chock blocks in under the boards to strengthen them.
 Paul's design is really comming together quickly and I'm starting to get the hang of it. We chatted about a workbench for modeling but Paul hasn't decided where it will go yet. Here is the lower level banchwork and the raised floor for the upper level. I'm so glad to be a part of this construction because I'm learing so much!
 Paul is still in the early stages of construction. This is the center "pit" of the first room and you can see the tons of pre-cut plywood that is needed for the construction.
 The "L" shaped item is the test profile for the upper part of the mushroom. You can see part of the elevated floor below. They designed this last time when I wasn't there. It is very strong and is quite easy to construct. Paul was not happy with the height of the upper level and says he's going to raise it a few inches. We had a lengthy conversation about the backdrop and the back board, which was not resolved at this point. I'm continuing to push for not using Masonite as it is a poor choice for construction here in the very humid South. The team isn't listening to me, so that is probably the way we'll go. I've been meaning to take them over to Howard's house and let him tell them about the Masonite that he ripped out and replaced because it warped.
 Glue Bob and Coalfinger Ken take an overview of the night's projects. Our first efforts were on the floor just beneath them where we finished cutting the "puzzle pieces" for the raised floor. Packrat was insistent on perfection in the cuts which annoyed some. Frankly I like the detail as it goes a long way to making the layout a nicer place. We may start calling him Picky Paul, but hey...it's his railroad. I'm thinking we were all very tired tonight for some reason. Caffeine is mandatory on late Friday nights.
Where Bob is standing will be the upper levels, one in front and one behind him. While I still don't fully understand the layout, I do know that this area is primarily the narrow gauge line and will have a continuous loop. I had encourage Packrat to build a model of the layout to help others with the spacial understanding and I think this is mandatory for a layout this complicated. I might get a wild hair and build it for him.
 Here is a close up of the upper level mushroom construction profile. This is just a study, and not the real thing. You can see the two L-girders, which we think can be made of boards that are not so long. It is amazingly strong.
 The upper bracing is attached to an L gider that is screwed into the ceiling joists.
 About 40% of the room has elevated flooring. This is of very sturdy construction with thick plywood screwed on top. Packrat plans to use carpet squares to cover the wood. The floor is very comfortable to your feet.
 Paul needs a lot of storage so we spent the rest of the evening building bracing for under layout shelving. We used 2x4 stock, which is overkill, but they are so cheap and he had them to spare. This will provide plenty of storage for Packrat's massive collection.
 Nothing is wasted here. We are saving every scrap of wood and making the best of it. So far the only thing that has been thrown away is an abundance of sawdust.
 In a moment of weakness, Packrat screwed up some fascia boards just too see what it would look like. I can see the trains running now!
 The room is very busy and cluttered. Mushroom layouts have such a compactness that there is very little room to move or walk. I'd suggested that he provide us with a work table top on the layout somewhere and to corrall the tools in one location so that they could be easily found. Paul also provided a ton of pencils (which we keep losing behind our ears). Our host has provided ample screw guns and charging stations, so batteries are never an issue. The only thing we really need more of are tape measures. I've got four of them now in a central location and it STILL isn't enough. The problem is that with Mushrooms, as the benchwork gets more complete the more difficult it will be to find tools since you have to travel through the layout to find things. I'd recommended a "cut through" on the far end so that you can duck under to the lower level or pass tools through, much like Iron Mike has.
 The floor is held up by 2x4 boards nailed into the concrete. To provide more support we cut chock blocks in under the boards to strengthen them.
 Paul's design is really comming together quickly and I'm starting to get the hang of it. We chatted about a workbench for modeling but Paul hasn't decided where it will go yet. Here is the lower level banchwork and the raised floor for the upper level. I'm so glad to be a part of this construction because I'm learing so much!
Saturday, May 2, 2009
Introduction to the Okefenokee Railroad
Here is a hand slide show that can introduce you to the layout...
http://www.savefile.com/files/2090486
This is a free storage site, so don't pay for anything, just download the Powerpoint file and enjoy.
Its stored on www.savefile.com
http://www.savefile.com/files/2090486
This is a free storage site, so don't pay for anything, just download the Powerpoint file and enjoy.
Its stored on www.savefile.com
Thoughts on The Swamp…
We’ll probably finish the benchwork this coming week, which means we’ll be laying track soon. There are so many things that I have to figure out and quickly. Now, keep in mind I’ve been designing this layout for about five years, so it is nothing new. I’ve even built some test modules as well. But I’ve never been happy with everything.
Prove that focusing layout design on people rather than trains can produce a higher level of realism and interest.
Goal:
To produce an On30 model railroad layout that focuses on the PEOPLE of the Okefenokee during the 1920’s when heavy cypress logging was in full swing. The layout will provide an insight into their lives and times as well as to the mythology of the great swamp.
Swamp Layout Objectives:
- Reproduce the flavor of swamp logging in the Southeast. Absolute accuracy is not important.
Techniques:
- To use Theatric Scenery to provide the richness of life and mythology in the railroad and to convey a sense of time, mood and feeling. See the theatric scenery spreadsheet.
- Use
- Convey prototype logging practices in the southeast swamp areas.
- Use story telling to help set the stage for the characters that live in the swamp. Make visitors feel that they know these people and can sympathize with their hardship.
Definitions:
Theatric Scenery – As with a theater, the backdrop and scenery set the mood. Likewise, I want to use the scenery not to just say “hey, we’re in a swamp” but to use it to build a mood and a feeling that the swamp itself brings. In the swamp, its people are the most important factor. I want the scenery to reflect not only where they live but how they feel and live. The swamp is a hot, sticky, infested place where few are hardy enough to exist. As you move deeper into the swamp the hard it is for humans to exist and the more mythology becomes prevalent.
Click on grid to expand...

Friday, April 10, 2009
The Gurney Has Been Designed!
Ok, I finally sat down at the computer and finished designing the gurney. The wheels are not in the drawing, but the rest is planned.

It will be on four heavy casters. The side boards that connect with the layout will be made out of cabinet grade poplar.

I also decided to do the fascia in fake alligator hide. What fun!

It will be on four heavy casters. The side boards that connect with the layout will be made out of cabinet grade poplar.

I also decided to do the fascia in fake alligator hide. What fun!
Sunday, April 5, 2009
Door Jam Damn
Somehow, someway, I drew the door incorrectly on the plan! How @$$#!$ stupid! The door is 36" and somehow I made it 46". I've fixed the plan.
Thanks to Bob the Builder for showing me the error of my ways...
So, if the rolling table is going to fit through the door, she has to be 34" max.
Oh crap...how much space do I have OUTSIDE of the door? It may not come out.
Drat.
Thanks to Bob the Builder for showing me the error of my ways...
So, if the rolling table is going to fit through the door, she has to be 34" max.
Oh crap...how much space do I have OUTSIDE of the door? It may not come out.
Drat.
Saturday, March 21, 2009
L-girders are up!
We were able to install the L-girders tonight. Thanks to a lone of a laser level from Iron Mike, we were able to get a very level straight line. The pre-made joist were screwed into the studs in the wall with 2 1/2" drywall screws. Gusset plates were put over each joint. The assembly goes all around the room and is ready for more benchwork.
We also laid out the line for the L-channel that holds the drop ceiling. The crew worked from 7:30 to midnight. Steve, Paul, Bob and my neighbor Mike all dropped in.
The team spent some time talking about how to put the pilings in for the track work. I like the idea of the flex-pilings, and we may try that. Bob had some great ideas about how to put the pilings in. Basically, we are going to have to run some tests. Total time tonight was 4.5 hours.
We also laid out the line for the L-channel that holds the drop ceiling. The crew worked from 7:30 to midnight. Steve, Paul, Bob and my neighbor Mike all dropped in.
The team spent some time talking about how to put the pilings in for the track work. I like the idea of the flex-pilings, and we may try that. Bob had some great ideas about how to put the pilings in. Basically, we are going to have to run some tests. Total time tonight was 4.5 hours.
Sunday, December 7, 2008
Adding Structures to The Swamp
Structures
This morning I’ll start a layer for structure identification and plug in the names so far. I'm using 3rd Plan It to do the layout drawing.
This morning I’ll start a layer for structure identification and plug in the names so far. I'm using 3rd Plan It to do the layout drawing.
Saturday, December 6, 2008
Designing the Layout
12/06/08 – Design
After visiting Howard Garner’s layout I decided to get down to brass tacks and start working on my own design. The room is about finished, we only need to put down the carpet squares.
I started by looking at the Billy’s Island map. It will be the center of operations for the swamp. I’ve moved it around the room several times, and the more I think about it the more I want a long mainline run. Therefore, I’m going to move it back to the right hand wall.
I’ve got the room drawing finished and checked. I did forget to put in the floor opening and the two drain pipes, so I’ll do those tonight. With that done, we’ll move on to Billy’s Island.
The track cuts straight across the island. Some of the neat features are a wye, a lack of an engine house, the presence of a machine shop and supply house, and a decidedly Jim Crow layout of structures.
Billy’s Island is named after an Indian Chief Billy Bowlegs.
In capturing the Okefenokee at this time, around 1920, I want to capture the beauty of the swamp, and it ugliness. Things like the hard life the loggers lived, racism, the conflict with those that lived in the swamp, the wholesale killing of animals and the raping of the land, and the size of the majestic cypress trees.
By the end of the session, this is what I had. This is on the left hand side of the train room as you walk in. This puts Billy’s Island ½ way between the mill and the end of the line, which is about where it needs to be. Full sized locos handle the traffic between Hebardville and Billy’s Island, then Porter’s handle the rest of the traffic.
I got the wye in. Black and white lumberjack quarters. The shop will be a featured model with detailed interior. The church and the office, and maybe the commissary may be detailed. The trackage, while condensed, matches the same profile as the island. Liberties were taken with the placement of buildings as the O scale structures, even ones this small, are large and take up space. This island, while very large by model train standards, will have deep scenery to give it a rich characteristic.
The scenicked island has dense pine trees and some palms and cypress. The soil is sandy and palmetto plants grow everywhere. So when you walk in the room, the back side of the swamp is the first thing you see, then your focal point spins around and catches the detailed shop and wye complex. The sidings are about six feet long, which is more than enough for the loco and several log bunks. MOW equipment can be stored on the coal bin track, and the water/coal track will remain open, or holding a loco ready for work. All of the other buildings will be omitted, unless I see a need to drop in a very small shack for saw filing or what not.
Things to be included at Billy’s Island
• Wye for turning motive power
• Passing siding
• Indian mounds
• Machine shop
• Supply house
• Black and white quarters
• Commissary
• Cemetary and tombstone
• Well for watering the locomotives on siding
• Coal bin on siding
• Office
• Doctor’s office
• Bakery
• Theatre
• Garden
After visiting Howard Garner’s layout I decided to get down to brass tacks and start working on my own design. The room is about finished, we only need to put down the carpet squares.
I started by looking at the Billy’s Island map. It will be the center of operations for the swamp. I’ve moved it around the room several times, and the more I think about it the more I want a long mainline run. Therefore, I’m going to move it back to the right hand wall.
I’ve got the room drawing finished and checked. I did forget to put in the floor opening and the two drain pipes, so I’ll do those tonight. With that done, we’ll move on to Billy’s Island.
The track cuts straight across the island. Some of the neat features are a wye, a lack of an engine house, the presence of a machine shop and supply house, and a decidedly Jim Crow layout of structures.
Billy’s Island is named after an Indian Chief Billy Bowlegs.
In capturing the Okefenokee at this time, around 1920, I want to capture the beauty of the swamp, and it ugliness. Things like the hard life the loggers lived, racism, the conflict with those that lived in the swamp, the wholesale killing of animals and the raping of the land, and the size of the majestic cypress trees.
By the end of the session, this is what I had. This is on the left hand side of the train room as you walk in. This puts Billy’s Island ½ way between the mill and the end of the line, which is about where it needs to be. Full sized locos handle the traffic between Hebardville and Billy’s Island, then Porter’s handle the rest of the traffic.
I got the wye in. Black and white lumberjack quarters. The shop will be a featured model with detailed interior. The church and the office, and maybe the commissary may be detailed. The trackage, while condensed, matches the same profile as the island. Liberties were taken with the placement of buildings as the O scale structures, even ones this small, are large and take up space. This island, while very large by model train standards, will have deep scenery to give it a rich characteristic.
The scenicked island has dense pine trees and some palms and cypress. The soil is sandy and palmetto plants grow everywhere. So when you walk in the room, the back side of the swamp is the first thing you see, then your focal point spins around and catches the detailed shop and wye complex. The sidings are about six feet long, which is more than enough for the loco and several log bunks. MOW equipment can be stored on the coal bin track, and the water/coal track will remain open, or holding a loco ready for work. All of the other buildings will be omitted, unless I see a need to drop in a very small shack for saw filing or what not.
Things to be included at Billy’s Island
• Wye for turning motive power
• Passing siding
• Indian mounds
• Machine shop
• Supply house
• Black and white quarters
• Commissary
• Cemetary and tombstone
• Well for watering the locomotives on siding
• Coal bin on siding
• Office
• Doctor’s office
• Bakery
• Theatre
• Garden
Subscribe to:
Posts (Atom)

