I'm off to Enid, Oklahoma for a three day trip this morning. To keep me out of bars and away from wild women in the evenings, I've included a current issue of Model Railroader and about 50 photos of alligators to study. During the trip I'll draw and sketch 12 gator models that I'll build in clay and cast.
We'll need lots of these critters in all sizes!
I used to carry modeling tools with me, but they really confuse the rocket scientist that work for Homeland Security. They either won't check my bag or steal them.
So I do my design work when I'm on the road.
Wednesday, July 29, 2009
Sunday, July 26, 2009
Close Up Pictures of an Alligator

On my trip to Birmingham we stopped for a visit to the Birmingham Zoo, which is quite nice. They had a "swamp" there and a big old fat American Alligator. He obliged me by sitting very still and only stretching once in a while as he baked in the sun. I shot several hundred detail photos of this fellow.

The swamp was covered in duck week, a green moss that completely blankets the top of the water.
 Just under the surface are small turtles and frogs....and....
 Alligators! This bull gator was about eight feet long and probably weighed around 900 lbs.
This fellow is one of two that I could see. He was basking in the sun and the duck weed was stuck all over his body. A nice bit of camouflage.
 This is as close as the zoo would let me get to the alligator. Actually, I wouldn't have even gotten that close except that it is a good ways down to his pen and lots of steel wire separates us.
 I have GREAT respect for alligators as I once watched a buddy of mine become a snack for one about the same size as this gator. If you want the story, post a comment saying so and I'll write it down.
Sunday, July 19, 2009
Sculpting Alligators
 In the 1920's Okefenokee Swamp, the alligators still reigned supreme. While the average gator was about 8 feet long, specimens in excess of 13 feet were common and reports of gators around 16 feet were not unheard of.
In order to model the swamp I think I'll need about 12 alligator masters to make about 40 models. The gators available as parts in 0 scale stink, so I'll have to carve my own. I took a stab at it today and my first effort was really good, but I got the head dimensions wrong. So, let's start studying alligators and taking pictures.
Information on Alligators
American Alligators
Gator Pictures
Computer Model of Alligator
Saturday, July 18, 2009
Big Doings In the Okefenokee - NCI Work Night
Every had one of those nights when everything you did was stupid? That was last night!
Attendance:
Gator Scott
Glue Bob
Packrat Paul
Concrete Keith
Steve-bay Steve
Coalfinger Keith
Reverend Rick
 Here is the pile of lighting materials that I bought at Lowes. See the missing item? It is a small grommet-like device called a connector that is used to hold the electrical line in place. The reason you don't see them is because I didn't know to buy them. Looks like we won't get far. Thanks to my friends, though...they kept me from making a big mistake!
 Rick Wade Photo
Gator gets out the first drop ceiling light. Packrat and Coalfinger look on. Packrat has a foot issue going and we hope he gets well soon. I think he broke it building his layout. Paul plays hard ball when he's building layouts!
 There are two ways to put the lights in so that they are in the middle of the room. We took the plan on the left.
 There are five each 2x4 light sets.
 I showed the guys my Swamp Book. This is a 3" ring binder full of photos of the swamp that I use for carving stumps and trees. And alligators!
 EAch photo has been carefully selected to help me build the layout.
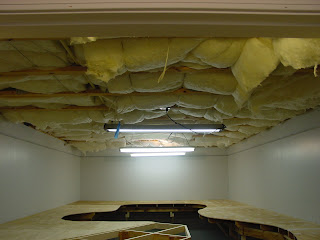 Here are the inexpensive temporary lights and the ugly insulation. Yuck.
 Rick Wade Photo
The guys take all the boxes apart and move them to the train room.
 Concrete and Steve-bay take on installing the return loop that is outside of the train room, next to the furnace. This is a hidden continous run loop just for show. The loop is 18" but Keith decides that he is working on his layout at home and makes them 30".
 Rick Wade Photo
Using scrap lumber Keith makes carefully detailed drawings.
 Rick Wade Photo
Using a radius tool, Keith makes the radius drawings while Steve waits with the saw.
 Rick Wade Photo
Using the sabre saw, Keith and Steve cut out the radius plates.
 Rick Wade Photo
Every few minutes Steve counts his fingers. Still has all ten.
 Here you can see Rick talking and drinking coffee. The dog is waiting for him to drop one of Marie's fresh made brownees. You can see the radius sections.
 After a quick check in with the foreman, we realize that 30" radius won't fit in the space allowed for the 18" radius. Ok, back to the drawing board. Let's just make a table and Scott can lay any radius he wants.
 Rick Wade Photo
Meanwhile Scott climbs the ladder and knocks in the boxes for the lights and strings the electrical line.
 Paul has taken on the project of wiring in two switches. Little does he know, its a trap!!!
 "I'll be damned if I can figure out what is going on here. I know Scott did this part of the wiring, so I'll ask him!"
 Rick Wade Photo
OOPS! Scott wired the thing wrong. Not only did he wire it wrong but it is so bad we'll have to cut out the sheetrock to figure it out. Scott is feeling stupid tonight. That is two strikes and we've not even made it to the first coffee break.
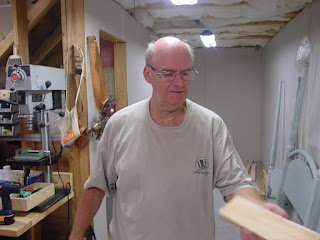
 Bob, Ken and Rick took on the task of filling in the screw head holes and finishing up the benchwork top.
 Rick was actually working. Rare, but this is a real photo...not staged.
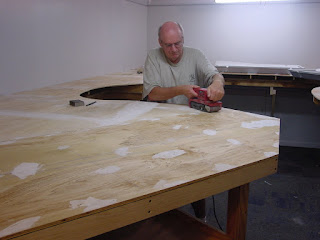
 Ken is sucking up the dust as the Rick sands. Bob is demonstrating the real strenght of this overbuilt benchwork.
 Scott is wiring up the lights and getting them ready to install.
 Rick Wade Photo
I believe Paul has figured out the wiring now!
 "Now let's just hope Scott didn't leave one of these wires hot!"
 Meanwhile, Keith and Steve are building a weekend getaway home for the Perry's.
 Rick Wade Photo
"Hey guys, want to come see the new table!"
 Rick Wade Photo
If its messy, Bob is the first to volunteer. I'd hate to have to do his laundry.
 The big shop vac really sucks.
 Here are the ballasts in the lights and the pigtail connector system, waiting on Scott who didn't bring the connectors.
 Almost done with the sanding!
 Rick found a few more holes and some screws that didn't go in all the way. He's driving them home.
 Wiring is in for the lights!
 Switches are in!
 Here is the wall section we had to remove because Scott is stupid!
 The decking is almost done! We'll cut the holes later.
 I'm not sure if I can get enough radius in this tight spot. Oh well. It may make a nice storage shelf.

This time we LABELED all the wires.
 Some last touches and we'll be ready for the gurney.
 If you want to build a layout, get a Bob. A Bob is a perfectionist, and when you are a generalist like me (that's French for sloppy) you need a Bob to keep you on track.
 We put the top on the gurney and realized it was a tad too tall. Keith suggested we bore out the set holes on the castors.
 Rick Wade Photo
GLUE BOB! GLUE BOB! GLUE BOB!
 A little drilling and some wrench work and the gurney is lowered!
 Here you can see the bottom of the gurney.
 Here is where we drilled the plywood out with a 1" spade bit.
 Bob made some cleats to raise the gurney up and keep it still.
 Here are the cleats mounted on the layout.
 A little sanding to make it fit and...
 A little more sanding to make it fit. DONE!
Wow, did we get a lot done tonight! Thanks guys for all the help and the fun!
Attendance:
Gator Scott
Glue Bob
Packrat Paul
Concrete Keith
Steve-bay Steve
Coalfinger Keith
Reverend Rick
 Here is the pile of lighting materials that I bought at Lowes. See the missing item? It is a small grommet-like device called a connector that is used to hold the electrical line in place. The reason you don't see them is because I didn't know to buy them. Looks like we won't get far. Thanks to my friends, though...they kept me from making a big mistake!
 Rick Wade Photo
 There are two ways to put the lights in so that they are in the middle of the room. We took the plan on the left.
 There are five each 2x4 light sets.
 I showed the guys my Swamp Book. This is a 3" ring binder full of photos of the swamp that I use for carving stumps and trees. And alligators!
 EAch photo has been carefully selected to help me build the layout.
 Here are the inexpensive temporary lights and the ugly insulation. Yuck.
 Rick Wade Photo
 Concrete and Steve-bay take on installing the return loop that is outside of the train room, next to the furnace. This is a hidden continous run loop just for show. The loop is 18" but Keith decides that he is working on his layout at home and makes them 30".
 Rick Wade Photo
 Rick Wade Photo
 Rick Wade Photo
 Rick Wade Photo
 Here you can see Rick talking and drinking coffee. The dog is waiting for him to drop one of Marie's fresh made brownees. You can see the radius sections.
 After a quick check in with the foreman, we realize that 30" radius won't fit in the space allowed for the 18" radius. Ok, back to the drawing board. Let's just make a table and Scott can lay any radius he wants.
 Rick Wade Photo
 Paul has taken on the project of wiring in two switches. Little does he know, its a trap!!!
 "I'll be damned if I can figure out what is going on here. I know Scott did this part of the wiring, so I'll ask him!"
 Rick Wade Photo
 Bob, Ken and Rick took on the task of filling in the screw head holes and finishing up the benchwork top.
 Rick was actually working. Rare, but this is a real photo...not staged.
 Ken is sucking up the dust as the Rick sands. Bob is demonstrating the real strenght of this overbuilt benchwork.
 Scott is wiring up the lights and getting them ready to install.
 Rick Wade Photo
 "Now let's just hope Scott didn't leave one of these wires hot!"
 Meanwhile, Keith and Steve are building a weekend getaway home for the Perry's.
 Rick Wade Photo
 Rick Wade Photo
 The big shop vac really sucks.
 Here are the ballasts in the lights and the pigtail connector system, waiting on Scott who didn't bring the connectors.
 Almost done with the sanding!
 Rick found a few more holes and some screws that didn't go in all the way. He's driving them home.
 Wiring is in for the lights!
 Switches are in!
 Here is the wall section we had to remove because Scott is stupid!
 The decking is almost done! We'll cut the holes later.
 I'm not sure if I can get enough radius in this tight spot. Oh well. It may make a nice storage shelf.
This time we LABELED all the wires.
 Some last touches and we'll be ready for the gurney.
 If you want to build a layout, get a Bob. A Bob is a perfectionist, and when you are a generalist like me (that's French for sloppy) you need a Bob to keep you on track.
 We put the top on the gurney and realized it was a tad too tall. Keith suggested we bore out the set holes on the castors.
 Rick Wade Photo
GLUE BOB! GLUE BOB! GLUE BOB!
 A little drilling and some wrench work and the gurney is lowered!
 Here you can see the bottom of the gurney.
 Here is where we drilled the plywood out with a 1" spade bit.
 Bob made some cleats to raise the gurney up and keep it still.
 Here are the cleats mounted on the layout.
 A little sanding to make it fit and...
 A little more sanding to make it fit. DONE!
Wow, did we get a lot done tonight! Thanks guys for all the help and the fun!
Subscribe to:
Posts (Atom)

