| 1 | Level the gurney and install locks |
| 2 | Trim back the tight aisle area |
| 3 | Install 1/4" flat top on benchwork |
| 4 | Install HVAC ducts |
| 5 | Build outside return loop |
| 6 | Build trial 2 x 2 scenery test |
| 7 | Seal all benchwork and sand |
| 8 | Paint benchwork top and the entire gurny |
| 9 | Cove back two walls |
| 10 | Install DCC power shelf |
| 11 | Build cypress low relief trees for backdrop |
| 12 | Purchase backdrop material and paint/install |
| 13 | Install ceiling lights |
| 14 | Install drop ceiling |
| 15 | Lay foam islands |
| 16 | Install trackwork |
| 17 | Wire in main DCC bus |
Sunday, June 28, 2009
Latest Priorities for the Swamp
A Little More Work Tonight
The benchwork is so close to being done! Taylor went to bed early so I headed back down to the shop.
 This one little section is the last real structure. I built an L-girder a little earlier today and decided that my drawing had it closer to the wall than it needed to be. So I brought it out to 16 inches and fastened it down tight.
 I added two joists and we are done. Didn't take long.
 The fascia needs a mounting for the reverse curve here, so I added the supports as planned. I didn't take into affect that the furthest one now needs to be moved because I brought the L-girders out, so that will be fixed when we put the fascia in.
All done! This will be a nice inset curve, a necessity in order to get to the back side of the wye.
 This little pocket also helps me to get better photos of the opposite side and to put in a backdrop for the town. Nothing on this layout is not planned.
 Stupidity wasn't planned either. In my haste I didn't read the plan and cut this corner square. It should have been rounded. Luckily we saved the piece (thanks Bob!).
 The piece fits after I cut the radius. Just need to support it. I put a 3" board across two L girders and drew a line where they supported the board, then sank 1 5/8" screws into the board.
 The top plate was heavily glued into place. It will be very strong when the glue fastens and I'll sand it smooth and fill up the small corner hole.
All that is left now is to put the top coat of 1/4" plywood on the rest of the benchwork and secure the gurney, then sand and paint the top. We'll be laying track soon!
Getting Ready for Power Building
I'm getting ready to power build on the layout. I can possible get the mainline done by the time the Piedmont Pilgrimage rolls around.
Here's what I've been doing:
http://modelrailroadersnotebook.blogspot.com/
Here's what I've been doing:
http://modelrailroadersnotebook.blogspot.com/
Saturday, June 20, 2009
Building a Battleship For the Train Layout
It's hot here at the Swamp. Air conditioner number #2 sprang a leak and the upstairs is a balmy 89 degrees, and its 99 outside so we're not opening the windows. AC #1 is pumping as hard as it can go, but the coolest place is always the basement, so that is where I spent the hot part of the day.
 Taylor and Marie came to visit alot as the cool breeze from the shop fans made it right comfy here in the Swamp.
 I went to Ace Hardward and bought the flat washers and fine threaded nuts to put the castors on the bottom of the gurney. Some people call these moving layout segments "battleships" or "mobile modules" but I still like gurney. The new castors roll very nicely.
 The legs will be made from ripped 3/4" plywood stock cut to 3" and 2" board widths. One 3" to one 2" per leg in L-girder fashion. I do the work on my 8 foot heavy workbench. One thing that I believe all layout builders should do is make sure they save room for a work area. Many layouts I work on are short of space and that makes for sloppy and dangerous work. I have two large rooms, a shop and a two car garage as well as the back yard to work in so we're good.
 I brace up the 2" board then glue and screw the 2" board along the 3" board making an L shape beam.
 Using the new L to support the other board, I repeat the process.
 Once the four legs were built, I screwed them into the bottom box.
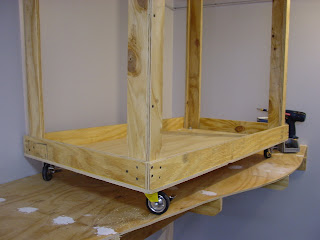 I used a level to make sure they were straight and did the work up on the benchwork so that I wasn't bending over or sitting on the hard floor. Looks good!
 I dropped the assembly to the floor and positioned it under the layout.
 A fan keeps the air circulating. I have not installed the air conditioning yet, but really its not that warm down here. The fan keeps it cool while its 99 degrees outside here in Georgia.
 The legs were checked for position and then the whole assembly was carefully leveled. Once level in every possible way, I anchored the legs onto the top benchwork with 1 5/8" drywall screws. She's solid!
 I rolled the gurney around and she moves great! The heavy base keeps her very stable.
 The gurney can be shoved into the back of the layout room to make way for work on the layout area behind the gurney. Its a little tight, though.
 This one corner needs to go on a diet. It's not a problem since this buildge is a scenic area and not critical to the main line.
 I made a note to myself to cut it back.
 I rolled the gurney out of the room and into the area that will be the crew lounge. Moves great!
 The ultimate test was to see if I could get it into the shop. I was able to get it inside fine!
 I can even turn it 360 degrees. This way I can do detail work on this section in the comfort of the shop where all my tools are, and in a climate controlled environment. I'm also next to the airbrush.
Oops! Scratch that idea. I could get it in to the shop because of the angled cut on one side. However, it wouldn't come out! This could be a pain. I had to tip it over to get it out.
 The final step was to build another shelf in the gurney. This shelf will hold the DCC system when the gurney is on tour as well as tools and models. It is much more shallow than the bottom shelf.
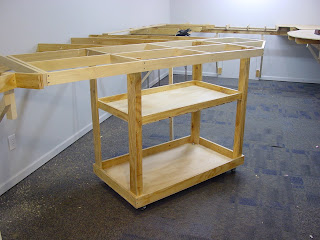 There! All done! Now my rolling display can go anywhere.
There is still just a little more benchwork to do, and I still don't have the right sanding belt, so I'm off to the Home Depot again. I may finish more of the benchwork tonight.
Friday, June 19, 2009
I Built a Box!
There was no need to make coffee tonight. All my train buddies from the North County Interchange Operating Group (NCI) are over at Packrat Paul's for train night. Sweet Marie is drinking with the Bunco group across the street. So I'm baby sitting. Not that I mind staying with Taylor, mind you, but she is asleep at 7:30 and I can't make loud noises. Arrgh!
I took a picture of the coffee to remind me to buy some more and some creamer.
 After the accident last week I took a look at the saw like Glue Bob recommended. He was right, this is a finishing blade and not a cutting blade. Still, it was a heck of a knot.

 The cutting blade for wood has gaps for clearing wood chips. This blade is for moulding.

I'm working on the gurney tonight. My camera ran out of battery power, so there aren't many pictures. Essentially I need to build a rolling carriage under the gurney. It needs to be strong to handle moving, and heavy to avoid tipping over. I'm going to build a box fram with a 3/4" thick plywood base to mount the castors on. Then I'll extend legs from the top frame to the box, and add another small shelf in the middle.
 The frame is built on top of the 26" x 48.5" sheet of plywood using 3/4" plywood ripped to 3" boards. All joints are glued and screwed.
 This "box" or fram will hold the legs and the castors. It will also hold items that I want to transport with the module.
 I started putting an additional pad glued to the base to hold the castor bolts, then realized after I had drilled one that the castor mounting bolts weren't that long. I had to pull them up.
 Then I realized the castors didn't come with a top nut. Damn. Ok, when nothing is going right, go upstairs and go to bed. More tomorrow!
I took a picture of the coffee to remind me to buy some more and some creamer.
 After the accident last week I took a look at the saw like Glue Bob recommended. He was right, this is a finishing blade and not a cutting blade. Still, it was a heck of a knot.
 The cutting blade for wood has gaps for clearing wood chips. This blade is for moulding.
I'm working on the gurney tonight. My camera ran out of battery power, so there aren't many pictures. Essentially I need to build a rolling carriage under the gurney. It needs to be strong to handle moving, and heavy to avoid tipping over. I'm going to build a box fram with a 3/4" thick plywood base to mount the castors on. Then I'll extend legs from the top frame to the box, and add another small shelf in the middle.
 The frame is built on top of the 26" x 48.5" sheet of plywood using 3/4" plywood ripped to 3" boards. All joints are glued and screwed.
 This "box" or fram will hold the legs and the castors. It will also hold items that I want to transport with the module.
 I started putting an additional pad glued to the base to hold the castor bolts, then realized after I had drilled one that the castor mounting bolts weren't that long. I had to pull them up.
 Then I realized the castors didn't come with a top nut. Damn. Ok, when nothing is going right, go upstairs and go to bed. More tomorrow!
Thursday, June 18, 2009
Swamp Rolling Stock
The SER Region contest got me fired up again to get my AP Certificates. Heck, there were ZERO narrow gauge entries. I could have shown up with beer cans and won. Crap.
Not next year! Especially since the Birmingham group challenged us to show...
So...
Time to build rolling stock. Yeah, I know I've scratch built a ton of cars before. But the ones I have are either damaged, not of a prototype or I don't have the drawings. Might as well start from, well, scratch!

The first two cars will be Hebard Cypress Company Crew Cars. These cars were used to carry the logging men to the deep swamp in bad weather. So I'm thinking the rest of the time they road on a logging flat in the hot swamp with the bugs. Yuck. Car "A" was for Whites and car "B" was for "Colord Men" as it says (misspelled) on the side. This is what is known as a "Jim Crow" car, a reflection of the rampant stupidity in the deep south. The two cars are identical except for minor details and I'm going to build one of each.
 If you don't have a copy of the hardback book Argent; Last Of The Swamp Rats by Mallory Hope Ferrell, I strongly suggest you get a copy. Its all about a South Carolina (and Georgia) narrow gauge logging company that lasted into the sixties. The photos are priceless. Above is a drawing by the legendary Thomas York of this car. Notice that it was built on a Russell Pattern 20 log car frame! What a cool car.

In order to build one and to get the points, I'm going to have to make my own drawings. The plan is to scratch built the car 100%. This, to me, also includes trucks and link & pin couplers. I plan to put the interior in as well so with all of this it should score more than 87.5 points, the minimum needed for an AP award. I'll put it in the passenger car category, which is seldom entered in our local contests.
Before I even started the plans, I actually scored this model! Yup, never even built it. But I know what it will be when I get done so I can estimate the score. Kind of backward planning, but you need to build to score, not build to be in the contest.
I'll finish the drawings in a few days. This is a freelanced model, so I'll change some things.
Not next year! Especially since the Birmingham group challenged us to show...
So...
Time to build rolling stock. Yeah, I know I've scratch built a ton of cars before. But the ones I have are either damaged, not of a prototype or I don't have the drawings. Might as well start from, well, scratch!

The first two cars will be Hebard Cypress Company Crew Cars. These cars were used to carry the logging men to the deep swamp in bad weather. So I'm thinking the rest of the time they road on a logging flat in the hot swamp with the bugs. Yuck. Car "A" was for Whites and car "B" was for "Colord Men" as it says (misspelled) on the side. This is what is known as a "Jim Crow" car, a reflection of the rampant stupidity in the deep south. The two cars are identical except for minor details and I'm going to build one of each.
 If you don't have a copy of the hardback book Argent; Last Of The Swamp Rats by Mallory Hope Ferrell, I strongly suggest you get a copy. Its all about a South Carolina (and Georgia) narrow gauge logging company that lasted into the sixties. The photos are priceless. Above is a drawing by the legendary Thomas York of this car. Notice that it was built on a Russell Pattern 20 log car frame! What a cool car.
In order to build one and to get the points, I'm going to have to make my own drawings. The plan is to scratch built the car 100%. This, to me, also includes trucks and link & pin couplers. I plan to put the interior in as well so with all of this it should score more than 87.5 points, the minimum needed for an AP award. I'll put it in the passenger car category, which is seldom entered in our local contests.
Before I even started the plans, I actually scored this model! Yup, never even built it. But I know what it will be when I get done so I can estimate the score. Kind of backward planning, but you need to build to score, not build to be in the contest.
I'll finish the drawings in a few days. This is a freelanced model, so I'll change some things.
Sunday, June 7, 2009
A Little On30 Inspiration
My friend Steve Austin has really been working! Here are some photos of his Elkhorn Iron & Timber Railroad.
http://s3.photobucket.com/albums/y94/sea1109/Elkhorn_Iron_and_Timber_Co/
http://s3.photobucket.com/albums/y94/sea1109/Elkhorn_Iron_and_Timber_Co/
Saturday, June 6, 2009
Knots, Nuts and Nearly Done!
We were short a few folks tonight but still got more done than I thought we ever wood. Taylor went to be early after a hug from Glue Bob and we got straight to work with Coalfinger Ken and later Mark the Neighbor.

Coalfinger brought in his new fancy Porter Cable drill with the Lowe's flip it bit that is a drill/countersink and a screwdriver bit. I love it! Gotta have it!
 I keep running out of screws so I took a picture of the 1 5/8ths drywall screws so that I remember to buy another box. May need more glue, too.
 We started the evening buy putting the gurney up on fake legs. It is very sturdy and level. This area of the layout I was saving for myself to build for NMRA A/P points, but I decided to let it go and get it done. 2013 is not far away!
 We put some temporary legs on with some handy and cheap clamps. You need clamps! Whenever you think you have enough, you don't, so buy more. Tell all your relatives to buy you clamps for your birthday. One day you'll have enough. My birthday is July 31st, by the way!
 With the gurney up on stilts the crew was able to get an idea of what I was seeing in my head. They were quite surprised and gave me the normal "you're stupid" looks. I'm use to it so we moved on. The scenery is very deep and Reverend Rick will understand.
 The base block was built with two3' boards. Nice and level with Concrete Keith's sturdy leg system.
 With the base done we now started looking at the angle piece. Everything is 30 degrees from the wall. I had to go back upstairs and get more dimensions from the CAD system which took up some time.
 INJURY! Our first really good injury happened tonight. It is the first time in the whole history of the group that we've had anything severe. Guess who took the shot! Bob asked me to cut a small block of a 2x4 so that we could use it as a support. Using my trusty hi-powered Dewalt chop saw I cut into what I thought was a clean board. There was a knot imbedded in the wood. It jammed the saw and the blade through the board back at me at the speed of light...and hit me right in the family jewels. I fell to the floor temporarily blinded as the board recocheted off the saw again and struck me just below the ribs. OUCH! I stayed on the floor on all fours unable to talk and then slowly got up and went up stairs to cry. I'm better now but have some very large and black bruises.
 Here you can see how the gurney is going to look. It is MUCH bigger than the guys thought but there is still a lot of space in the layout room.
 Mark and Bob werestled the poplar contact board into place as Ken and I tried to keep the gurney from moving.
 Screws and glue were used at all joints. We don't want anything to move because it won't align with the moving gurney.
 Next, we placed the long 8' poplar face board in and supported it with a 64" plywood board. Solid and level! I keep copies of all the detail drawings and notes on a bright yellow clipboard that is easy for the team to find when they need it. The clipboard backing helps keep the drawings from getting damaged and gives you a good writing surface. The bright yellow plastic makes it easier to find than the masonite clipboards.
 Once all the supports were in, we finally got tired of tyring to decide how to put the legs in, so Bob grabbed a piece of L-girder and we just screwed one in.
 Here is all the supporting benchwork! It's very big and deep, but that is what you need for O scale.
 Naturally I just have to put a train on the table. Ken and Mark are tired at 11:30 pm so I'll send them on home.
 Wow! I can see the scenery already!
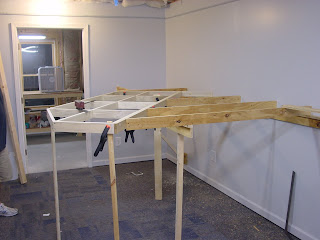 A lot of work went in to this section, but the hard part is still to come. The mobile gurney leg/castor system is going to be tough.
 We move the clamps down to give us a smooth surface. The nice poplar wood is pleasant to work with.
Went spent some time talking about the Penoles layout and there are some problems with it from a raffle layout standpoint. It still has merit as a stand alone layout and I will finish the project.
I also showed the team my adobe building model that now has vigas on it. They liked it but I hate the thing. Time to build another one.
Thanks guys for another great evening!
Subscribe to:
Posts (Atom)

