Gee, guys, sorry I haven't posted lately. I've been working on another project...
http://on30mininglayout.blogspot.com/
Since I'm babysitting Friday night so my wife can go out with all the cute gals in the Bunco squad and drink all night, I'm going to work on the swamp. Look for a new post Saturday as I get some more of the tricky benchwork knocked out.
Thursday, May 28, 2009
Sunday, May 24, 2009

Monday, May 18, 2009
Bayou Bell
I love to get mail. I really love unexpected mail. But when a package comes to me with my railroad's name on it, I just can't wait to open it. What will it be?
 It's a set of bells in O Scale! It seems my good friend and most admired train nut Pat Turner of Turner Model Works read the story about the bell that was lost in the swamp and sent us a replacement! Actually, it will be buried in the water below the church ruins for you to find when you visit.
Pat is a great fellow and I love the stuff his company sells. They have kits and detail parts of every kind. What really gets me is that Pat is just a great guy and a super friend and would do anything in the world to help you. That kind of person will do well in this hobby.
Thanks for the cool bells, Pat!
Popsicle Rick Redo...
My friend Rick was just driven absolutely mad because I had photos of his layout with popsicle sticks supporting a retaining wall for the trains while his scenery was being constructed. Being the perfectionist that he is, I got this email today...
Scott...


Here's what they looked like before the surgery...

I hereby christen Mr. Rick Wade to forever be....Popsicle Rick!
Scott...
Ever since the field trip when you guys visited the Richlawn Railroad and did a very nice write up on your site, something was bugging me in the back of my mind..................and then I figured out what it was - the sticks! I'm not dis'n you, for it was a great article. As I looked at those popsicle sticks, I though what's next? - duck tape & bailing wire?
Sooooo, off to Home Depot I went and bought some clear plastic sheet. I made a jig, cut pieces "popsicle stick size" and replaced the wooden sticks with the clear plastic. Even though they are "temporary" (which could mean 6 months to 6 years!), they look much better as they virtually "disappear" from a distance! Thanks!
Ding Dong the sticks are dead!
Which old sticks? The popsicle sticks!
Here's a close-up view - Note in the background how much better it looks!


Here's what they looked like before the surgery...

I hereby christen Mr. Rick Wade to forever be....Popsicle Rick!
Sunday, May 17, 2009
Happy Birthday To Iron Mike!
Wow what a party! Marie and I, along with most of the NCI group, went to the new train store for a hell of a birthday party for Iron Mike. He's 50 today! They had an open bar, music, a bar, lot's of great food, a bar, a cake, a bar, a video presentation about Mike, a bar....see the theme? I drank way too much.
Bob went over and helped Mike set up the Raffle Layout. It was a great addition to the party and was where many people congregated.
Happy Birthday, Mike!
Bob went over and helped Mike set up the Raffle Layout. It was a great addition to the party and was where many people congregated.
Happy Birthday, Mike!
Saturday, May 16, 2009
Field Trip - Neil Thomas's Diamond River in HO
It is always a fun to go on our monthly field trip. We do it once a month on a Saturday morning and Taylor, the club mascot and my daughter, always comes along. She loves trains.
 Our visit this week is over to Neil Thomas's house. I've looked forward to this all week and thought I might miss it as my daughter was having some complications from a shot that the doctor gave her on Wednesday. Luckily she is ok and we got to go on the trip.
 Neil built a fine layout and decided he didn't like some of the operating aspects of it. So he tore it out and rebuilt it almost overnight. I love the new design!
 He was able to reuse most of the lumber and screws, along with the electrical components.
 Neil tells us about his plans (dark shirt) while Taylor and I look at all the structures.
 Here is one of the main towns with some industry already popping up. The sidings are long and spacious.
 Here is a below-level storage area. Neil has decided not to have hidden storage.
 His benchwork is pine dimensional lumber.
 Bob's brain is cranking "what if" statements and taking it all in as Paul with his new buzz cut asks Neil a question.
 The long aisles have track on both sides. This layout is slightly bigger than the previous one.
 Here is some more staging of which there is a lot more than before. Neil really knows what he wants now and is building it quickly.
 His benchwork is flawless and strong. The aisles are spacious. I can't wait to get an invite to operate on it!
 The staging is both the "to" and "from" location.
 He's using masonite strips for the roadbed. The right-of-way is slow curving and pleasing to the eye. It is also strong and very quiet.
 Here you can see the corner.
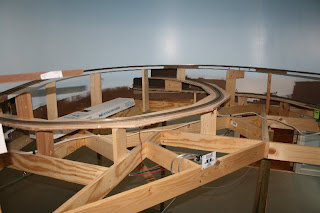 The loop helps the train navigate up to the next level.
 The DCC system is Digitrax and comes from the previous layout. This panel folds down for easy access.
 Some of the roadbed is on homasote.
 This is the underneath side of the turnout, constructed of Masonite.
 Neil was kind enough to run a train over the roadbed for us...quiet and smooth! He builds excellent trackwork!
 Two trains play around the loop.
 The Tortoise is mounted on a small square of Masonite and then attached underneath the raodbed.
 A lonely cabosse tags along.
 While there I met Brad who is building an Atlanta 1940's layout, so we exchanged emails and I'll catch up with him later.
As always, it is fun to visit Neil. He's a perfectionist and is willing to put in the hard work to make things right. I have no doubt that this layout will run flawlessly! Thanks for the field trip, Neil! I always learn a lot from you.
Key Learnings:
- When in doubt, rip it out.
- Masonite roadbed is strong, curves well and deadens sound.
- Masonite facia is not a good choice in the south.
- You can reuse a lot of materials from an old layout, including the screws. Waste not, want more.
- Good aisle space is wider aislespace.
- Putting a light coat of white paint over the used pine boards on the top of the open grid benchwork will wipe out old pencil marks and give you a clean surface to work with.
- Don't cut Masonite in the train room. Do it outside or in another area as it creates significant amounts of dust.
- Don't hide staging, but keep it easily accessible.
Easy Trees and Track Plans
It was a fun night for model trains! We had a good turn out at my house and I appreciate the guys coming over since my wife was out at Bunco and I couldn't go out since the Punkin was with me. She was very cute tonight and dressed up formally to great the men as they came buy.
Tonight's players: Steve-bay, Glue Bob, Coalfinger Ken, Reverend Wade, and a shaved Packrat Paul who looked like Curly from the Three Stooges. Man, I wish my company would let me do that. Much cooler in the summer. Mark my neighbor also dropped in to help.
 The goal tonight was to work on Coalfinger's coal mining layout. He has a 3x6 layout already and is adding another 3x7 foot extension. He wanted our input on his design.
 I love his finished portion, so and addition would be even better. Here you can see a mock up of the track plan. Click on the photos to enlarge.
 The room is plenty big enough for the layout. Here Bob checks the clearances and sees that they are at least two feet all around.
 Naturally I can't mind my own business so I had to redraw the layout. Ken may never speak to me again and I wouldn't blame him. But its his layout and he can do whatever he wants with it. The major suggestions were:
 Next we had a tree making party for Bob's layout! Yes, we didn't work on mine and that's ok. I have plenty of expendable room and work tables, so its easier here to do messy projects. Bob sent us an article on making inexpensive connifer trees done by a fellow named Dave Lawler at an ONR convention. The trees are magnificent. Our first step was to tinker with the technique.
 The first tree had too much paint on it and too much flock. We thinned it down for the next one. Bob wasn't real pleased.
 Once we got the technique down pat, we set up an assembly line with cutting and trimming, painting, flocking, and storage. Basically we were flocking all night!
 Here Bob and Steve are adding the second coat of flocking to a lightly sprayed tree. On this step we used a clear paint.
 Bang it, dang it! I have to slap the tree to get the loose flock off.
 A little more light flock to the top than on the bottom.
 Steve puts the finishing touches on the tree and pushes it into foam for drying.
 Not great, but not bad. Let's make some more!
 Basically all you need is some garland rope, cutting pliers, scissors, dk green, green, brown and clear spray paint and some Woodland Scenics flock in different colors.
 We coverd the table in newspapers and applied the flock over folded pieces of cardboard so that we could recycle the flock. In retrospect, it would have been easier to use a plastic tub. This is a messy business and we wore latex gloves to keep the green off our fingers. The spray paint is another issue. We took a box fan and put it in the window, then opened a door to get fresh air circulating to pull out the fumes. I was stoned in minutes!
 Many of the aerosol cans say "the color matches the cap" which is all well and good until you take the cap off. So I wrote on the dome of the can with a Sharpie marker the color so we could quickly pick up the right can.
 The first step is to trim the "tree" in a tapered fashion and to trim out some of the "limbs". Once that is done the trunk of the tree needs to have all limbs removed. We then spray the trunk with brown paint and set it aside for a few minutes to dry. The next step is to take the dark green paint and spray the tree limbs. We did this in a directly down from the top of the tree direction, then a directly up from the bottom direction. You want to cover the needles, but not soak them in paint. Quickly then you shake or sprinkle dark green flock over all the tree. Once the tree is covered, shake out the excess flock on the cardboard and set the tree in a foam sheet for drying.
 The first step gives you a nice, green fluffy tree! These trees are destined for the northern regions of Canada so they are naturally a little sparse and thin.
 We used a paint box to catch the overspray. Here are some trimmed trees with painted trunks that are drying.
 Reverend Rick has a keen eye and is not above rejecting a poorly trimmed tree. Note the green paint on his fingers. Gloves are a must!
 Mark, who is not a model railroader, didn't hesitate to jump in. We had an assembly line going. Paul, Mark and Ken would trim the trees, which takes the longest amount of time. Rick and I would paint the trunks and put the first coat of green flock on. Steve and Bob would put the second lighter coat of flock on the tree and do any final touch ups or corrections. Perfect! Having a bench high long table to work around helps.
 Here you can see some of the finished trees. Magnificent! Cheap! Fast!
 Once we got the tree techniques figured out and got a rythym going, the work went fast.
 Being a factory guy, mass production of items, especially trees, makes a lot of sense. In just less than two hours the team made 75 trees at a very low cost per tree. We had a great time chatting and kicking around new ideas (and each other).
 The trees look very realistic, especially from a few feet away.
 Here is Bob's forest!
 Here are 25 trees, completely finished on their foam carrier. They'll spend the night at my house while the paint dries. They vary in size from 10 scale feet to 80 scale feet.
It was a great evening!
Tonight's players: Steve-bay, Glue Bob, Coalfinger Ken, Reverend Wade, and a shaved Packrat Paul who looked like Curly from the Three Stooges. Man, I wish my company would let me do that. Much cooler in the summer. Mark my neighbor also dropped in to help.
 The goal tonight was to work on Coalfinger's coal mining layout. He has a 3x6 layout already and is adding another 3x7 foot extension. He wanted our input on his design.
 I love his finished portion, so and addition would be even better. Here you can see a mock up of the track plan. Click on the photos to enlarge.
 The room is plenty big enough for the layout. Here Bob checks the clearances and sees that they are at least two feet all around.
 Naturally I can't mind my own business so I had to redraw the layout. Ken may never speak to me again and I wouldn't blame him. But its his layout and he can do whatever he wants with it. The major suggestions were:
- The yard didn't have an adequate yard lead or a run around track, so we added them.
- We flipped the whole yard complex so that it was accessed from what would be the end of the line.
- Took out the turn table as a maintenance issue is always present.
- Put a loco run around or "escape track" in the yard.
- Installed a scenic divider to separate the coal region optically
- Put in a run around track for the coal mine.
- Add industrial back drop to the yard.
- Moved the ice house close to the main line where it should be
- Lengthened the main siding.
 Next we had a tree making party for Bob's layout! Yes, we didn't work on mine and that's ok. I have plenty of expendable room and work tables, so its easier here to do messy projects. Bob sent us an article on making inexpensive connifer trees done by a fellow named Dave Lawler at an ONR convention. The trees are magnificent. Our first step was to tinker with the technique.
 The first tree had too much paint on it and too much flock. We thinned it down for the next one. Bob wasn't real pleased.
 Once we got the technique down pat, we set up an assembly line with cutting and trimming, painting, flocking, and storage. Basically we were flocking all night!
 Here Bob and Steve are adding the second coat of flocking to a lightly sprayed tree. On this step we used a clear paint.
 Bang it, dang it! I have to slap the tree to get the loose flock off.
 A little more light flock to the top than on the bottom.
 Steve puts the finishing touches on the tree and pushes it into foam for drying.
 Not great, but not bad. Let's make some more!
 Basically all you need is some garland rope, cutting pliers, scissors, dk green, green, brown and clear spray paint and some Woodland Scenics flock in different colors.
 We coverd the table in newspapers and applied the flock over folded pieces of cardboard so that we could recycle the flock. In retrospect, it would have been easier to use a plastic tub. This is a messy business and we wore latex gloves to keep the green off our fingers. The spray paint is another issue. We took a box fan and put it in the window, then opened a door to get fresh air circulating to pull out the fumes. I was stoned in minutes!
 Many of the aerosol cans say "the color matches the cap" which is all well and good until you take the cap off. So I wrote on the dome of the can with a Sharpie marker the color so we could quickly pick up the right can.
 The first step is to trim the "tree" in a tapered fashion and to trim out some of the "limbs". Once that is done the trunk of the tree needs to have all limbs removed. We then spray the trunk with brown paint and set it aside for a few minutes to dry. The next step is to take the dark green paint and spray the tree limbs. We did this in a directly down from the top of the tree direction, then a directly up from the bottom direction. You want to cover the needles, but not soak them in paint. Quickly then you shake or sprinkle dark green flock over all the tree. Once the tree is covered, shake out the excess flock on the cardboard and set the tree in a foam sheet for drying.
 The first step gives you a nice, green fluffy tree! These trees are destined for the northern regions of Canada so they are naturally a little sparse and thin.
 We used a paint box to catch the overspray. Here are some trimmed trees with painted trunks that are drying.
 Reverend Rick has a keen eye and is not above rejecting a poorly trimmed tree. Note the green paint on his fingers. Gloves are a must!
 Mark, who is not a model railroader, didn't hesitate to jump in. We had an assembly line going. Paul, Mark and Ken would trim the trees, which takes the longest amount of time. Rick and I would paint the trunks and put the first coat of green flock on. Steve and Bob would put the second lighter coat of flock on the tree and do any final touch ups or corrections. Perfect! Having a bench high long table to work around helps.
 Here you can see some of the finished trees. Magnificent! Cheap! Fast!
 Once we got the tree techniques figured out and got a rythym going, the work went fast.
 Being a factory guy, mass production of items, especially trees, makes a lot of sense. In just less than two hours the team made 75 trees at a very low cost per tree. We had a great time chatting and kicking around new ideas (and each other).
  The trees look very realistic, especially from a few feet away.
 Here is Bob's forest!
 Here are 25 trees, completely finished on their foam carrier. They'll spend the night at my house while the paint dries. They vary in size from 10 scale feet to 80 scale feet.
It was a great evening!
Subscribe to:
Posts (Atom)

